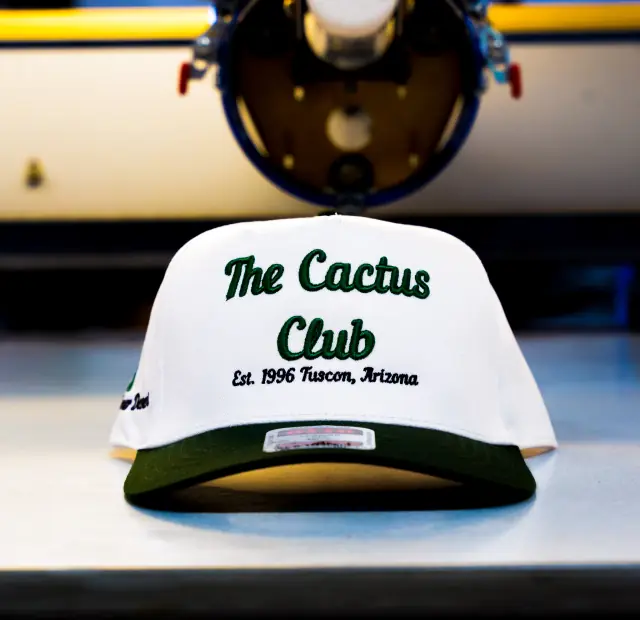
Where a cap can be decorated
A cap has one main canvas and a handful of small ones. The working sizes below are typical for structured adult caps; the real limits come from the style's crown height and curve and from the decorator's frames, so ask for the template for the exact cap.
| Location | Typical design size | What to know |
|---|---|---|
| Front panel | Commonly up to about 2–2.5 in tall and 4–5 in wide | The main logo; low profile fronts allow less height |
| Left or right side | Roughly 1.5–2 in across | Small marks, initials, flags; needs solid side panels |
| Back, above the closure | About 1 in tall | Short words or a URL, straight or arched over the strap opening |
| Back of a closed cap | Larger than above a strap opening | Fitted and stretch caps have a full back panel |
| Bill | Small | Possible on some machines and frames; ask first |
| Inside | A printed taping or label | A finishing detail rather than decoration |
Many hat orders use the front alone or the front plus one small extra. Every added location is a separate setup and a separate pass on the machine, so it adds cost and time even when the extra logo is tiny.
Front embroidery on a cap frame
Caps are not sewn in a flat hoop. A cap frame clamps the crown along the bill seam and holds the front in its natural curve, and a cap driver on the machine swings the frame from side to side as the needle works. The panel is never flat under the needle, so a logo prepared for a shirt usually sews badly on a hat.
Cap designs are digitized to sew from the center outward and from the bottom up, which pushes any slack fabric toward the edges instead of trapping it in a wrinkle. Underlay, density and pull compensation are set for buckram and a center seam rather than for a knit. Embroidery digitizing covers what changes in the file; on a six-panel cap, the seam also shapes how the design is centered, as cap profiles and fits explains.
Detail has limits. Lettering much under about a quarter inch tall tends to close up, thin lines wander on the curve, and gradients have to be split into separate thread colors or dropped. Each extra color adds a thread change and usually more trims, so a ten-color logo occupies the machine longer than a three-color one with the same stitch count. Most hat logos look strongest in two to four colors with bold satin stitch lettering.
Flat or 3D puff
Flat embroidery is the default and works on almost every cap. 3D puff embroidery sews satin stitches over a layer of foam so letters stand out from the panel. It needs bold shapes and wide columns, and it looks its best on a structured mid or high front. Many hats mix the two: a puff wordmark with a small flat detail beneath it. What is 3D puff embroidery covers design rules, and 3D puff on hats vs garments covers cap-specific limits.
Embroidering before the cap is sewn
Fully custom caps can be embroidered on flat panels before the cap is assembled, which allows designs that run across seams or wrap from the front onto the sides. That is a made-to-order program with its own minimums, sampling and lead time rather than decoration on a stock cap. Blanks vs cut and sew explains when building from scratch makes sense.
Side, back and bill
Side panels are sewn with the cap clamped on its side. On all-fabric caps they take a small mark well. On most truckers the sides are mesh, which gives stitches almost nothing to hold, so side logos there are best kept tiny and simple or skipped.
The back offers a short band of fabric above the snap or strap opening. Arched text, a web address or a small icon fits; a tall design does not. Fitted and stretch-fit caps have a closed back, so a larger back logo is possible.
The bill can take a small stitched mark on some setups, but it is awkward on a finished cap and many decorators avoid it. If a bill detail matters to the design, confirm it before the artwork is final.
Patches on hats
A patch is made separately and then attached, so it can do things direct embroidery cannot: finer detail, a molded 3D face or a debossed surface. Richardson's decoration menu for the 112 lists embroidered, sublimated, woven and rubber patches as well as genuine or faux leather, etched or debossed, which gives a sense of the usual range.
| Patch type | Look | Detail | Notes on caps |
|---|---|---|---|
| Embroidered | Classic stitched badge with a raised border | Medium | The traditional choice; sits well on structured fronts |
| Woven | Thin and flat with a smooth face | High; small text holds | Lies flat on curved and unstructured fronts |
| PVC or rubber | Molded, glossy or matte, dimensional | Medium | Stiff; best on firm fronts with a gentle curve |
| Leather or faux leather | Debossed or laser-etched, one-tone | Medium | Workwear and outdoor look |
| Sublimated (printed) | Full color on a polyester base | Photographic | Flat, no texture |
Patches attach by sewing around the border on a cap frame, by heat-activated adhesive, or both: the adhesive positions the patch and the stitching keeps it there. Sewn edges last longest. Adhesive alone can lift on a tight curve or after a lot of sweat and sun, so ask how the decorator attaches each type. Custom patches goes deeper into borders, backings and materials.
A patch hat involves two production steps: the patches are made in their own run, often with their own minimum, and then they are applied to the caps. That is why patch orders take longer to plan than direct embroidery.
Printing and transfers on caps
Direct screen printing uses a hat platen that grips the crown and holds the front steady under the screen. It works best on smooth one-piece fronts such as foam truckers and five-panel caps; on a six-panel cap the center seam breaks up the ink. Screen printing builds one screen per color, so it suits bold spot-color art in volume.
Heat transfers are printed first and pressed on with a curved hat press. Screen-printed plastisol transfers repeat simple art cheaply in larger runs, and DTF transfers carry full color and gradients without a screen per color. Richardson's menu for the 112 also lists silicone transfers, which give a soft, slightly raised rubbery finish. Transfers leave a thin film on the surface, and edges can lift if the press is too cool or too light.
Sublimation dyes the fibers of a white or very light polyester front and leaves no texture at all. It does not work on cotton or dark fronts, and although white polyester mesh will take the dye, the holes break the image up.
Mesh does not take print well in any of these forms, because there is too little surface. Foam trucker hats covers printing on the most print-friendly cap in detail.
The methods compared
| Method | Look and feel | Fine detail | Best caps | Main cost drivers |
|---|---|---|---|---|
| Flat embroidery | Textured thread with a slight sheen; very durable | Medium | Structured twill, dad hats | Stitch count, digitizing, locations |
| 3D puff embroidery | Raised and bold | Low; thick shapes only | Structured mid and high fronts | Foam step and higher stitch counts |
| Embroidered patch | Bordered badge | Medium | Most caps, including foam fronts | Patch run plus attaching |
| Woven patch | Flat and fine | High | Curved and unstructured fronts | Patch run plus attaching |
| PVC or leather patch | Molded or debossed | Medium | Firm structured fronts | Mold or die, patch run, attaching |
| Screen print | Flat ink, bright color | Medium to high | Foam and five-panel fronts | Screens per color, quantity |
| Heat transfer | Thin film, full color possible | High | Smooth fronts | Transfer production, pressing time |
| Sublimation | No feel, photographic color | High | White polyester fronts | Blank choice, artwork |
What drives cost and minimums
- Stitch count. Embroidery time follows the number of stitches, and big solid fills add up fast. Stitch count and pricing explains how to trim it without hurting the logo.
- Digitizing. A design is digitized once per version; a cap version and a flat-garment version of the same logo are separate files.
- Locations. Each placement is its own hooping and machine pass.
- Thread colors. More colors mean more changes and trims, and sometimes splitting a design that exceeds what one machine carries.
- Patches. You pay for the patch run and for attaching, and the patch maker's minimum can set the smallest sensible hat order.
- Printing. Screens per color and per location, or the cost of transfers, spread across the run. What drives screen printing cost explains the structure.
- The cap itself. Style, colorway and size range all move the blank cost.
- Quantity. Setup is fixed per design, so every extra hat lowers the share each one carries.
Searches for "custom hat embroidery no minimum" are looking for very small runs. Single-piece embroidery exists, but each cap then carries the full setup, so the price per hat is far higher than in a larger order. Before comparing quotes, check what is included: digitizing, a sew-out photo, thread matching and shipping. The MOQ entry explains why minimums exist at all.
Mockups, sew-outs and approval
- Send clean artwork. Vector files are best; a sharp, high-resolution image can be digitized but leaves more to interpretation.
- Approve a mockup with measurements. It should show the cap style and colorway, the design's width and height, its distance above the bill seam, and the thread colors by name or number.
- Match thread to the cap, not the screen. Thread charts are physical; a navy that looks right on a monitor can vanish on a navy cap.
- Ask for a sew-out. A test stitch on the actual cap, photographed or sent, is the cap equivalent of a strike-off. It catches puckering, seam problems and colors that read wrong.
- Approve in writing. Write down the style number, colorway, sizes, placement and thread colors so a reorder months later comes back the same.
For choosing the cap itself, start with cap profiles and fits and the spec comparison in popular trucker hat styles.
Sources
- Richardson 112 Trucker product page (decoration options), checked 2026-10-04
- Richardson 113 Foamie Trucker product page (decoration options), checked 2026-10-04
Useful for: companies, clothing brands, breweries, sports teams.